¶ Project scope
This document describes how to set up Pi-Hole for network-wide ad blocking. It also includes optional steps for setting up Unbound for recursive DNS resolution in case you don't want to use a third-party DNS resolver like Google or Cloudflare.
Please click the below dropdowns to access the section you need.
Overview
Pi-Hole is a popular DNS sinkhole that serves as a network-wide ad blocker. It's easy to set up and it works wonders on blocking ads and trackers on your network. It can run on very light hardware, including its namesake, the Raspberry Pi.
My installation sits in a Linux Container (LXC) on one of my Proxmox nodes. (Proxmox is the hypervisor that I use on my servers.) An LXC uses fewer resources than a full virtual machine.
With this project, I also use Unbound for recursive DNS resolution. It supports both DNS-over-TLS and DNS-over-HTTPS for increased security and privacy. This means that I am not subject to a third-party for my DNS resolution, like Cloudflare or Google. One the great things about this is that it doesn't require much more effort or configuration on top of getting Pi-Hole going. This is an optional step.
Prerequisites and preparation
¶ Prerequisites and preparation
To use Pi-Hole, it is recommended that you have a supported Linux distribution (distro) running. The Pi-Hole project officially supports Raspberry Pi OS, Ubuntu, Debian, Fedora, and CentOS. You can also install Pi-Hole in a Docker container, which is not described here.
Unbound should be available in all distro repositories.
For the sake of this documentation, I will assume that you're using a Debian-based distro. (From the supported list, that would be Debian itself, Ubuntu, and Raspberry Pi OS.)
You will need, at minimum, 2GB of file space (4GB is recommended) and 512MB of RAM. If you want to have internet access with no downtime, you will need a machine that runs 24/7. This could be something as small as a single-board computer (e.g. a Raspberry Pi, Orange Pi, etc.) or a cheap mini PC.
You will also need access to your router's DNS settings if you wish to apply Pi-Hole's ad blocking to your whole network. Please be sure you know how to do this, as it is outside the scope of this to cover every router manufacturer's firmware. (Most router interfaces can be found at 192.168.1.1 in your browser.)
If you can't change your router's DNS settings, you can still use Pi-Hole for ad blocking by changing the DNS settings on your devices. I encourage you to look up how to do that for your device(s) specifically as I will not cover that here.
Installing Pi-Hole
¶ Project steps
Below are the steps needed to get Pi-Hole installed. The full page version may be viewed here.
- Open a terminal on the machine you'd like to install Pi-Hole on, be it locally or over SSH.
- Input the following command in the terminal.
curl -sSL https://install.pi-hole.net | bash
- Enter your user account password. Let the installation script go through its process until it asks you for input. Follow the prompts.
- At the Choose An Interface screen, your default ethernet device should be the first option selected. It might be called
eth0orens18. - On the Choose Upstream DNS Provider screen, for now, choose something like Google. You will be changing this later after you install and configure Unbound.
- On the Blocklists screen, select
Yesto use the default blocklist. You can adjust this later if you choose. - On the Admin Web Interface screen, select
Yes. - On the Web Server screen, select
Yesto install admin interface's web server requirements. - At Enable Logging, this is a personal preference. If you want to see everything that Pi-Hole is blocking and allowing, select
Yes. Otherwise, selectNo. - If you opted to enable logging, choose what privacy level you would like. The default, Show Everything, can be helpful for troubleshooting or simply for those curious.
- After this, the script will continue its installation process.
- Be sure to set a static IP address for the Pi-Hole machine in your router settings.
- To access the admin interface, in your browser, type in either
http://pi.hole/adminorhttp://SERVERIP/admin. - The following screen will appear.
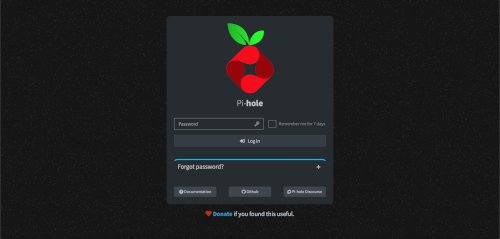
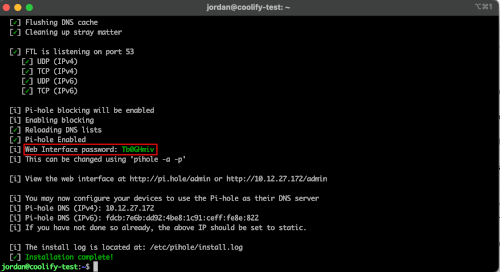
- To access the password, go back to the terminal window and look several lines up from the bottom for a line that says
Web Interface Password:.
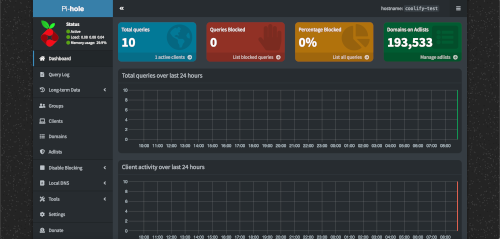
- Once you enter your password, you will see the web interface, which should look like the below image.
- Go to your router's DNS settings and input the Pi-Hole server's IP address. Save the options and go test an ad-heavy website, such as MSN.
Optional: Installing Unbound
¶ Project steps
Below are the steps needed to get Unbound installed and configured. The full page version may be viewed here.
- Open a terminal on the machine where you installed Pi-Hole, be it locally or over SSH.
- For Debian-based distros, input the following command.
sudo apt install unbound
- After the installation completes, you will need to set up the config file for Pi-Hole. To do so, open the following file in your command line text editor, such as nano.
/etc/unbound/unbound.conf.d/pi-hole.conf
- Copy the following contents into the blank file.
Unbound config
  server:
  # If no logfile is specified, syslog is used
  # logfile: "/var/log/unbound/unbound.log"
  verbosity: 0

  interface: 127.0.0.1
  port: 5335
  do-ip4: yes
  do-udp: yes
  do-tcp: yes

  # May be set to yes if you have IPv6 connectivity
  do-ip6: no

  # You want to leave this to no unless you have *native* IPv6. With 6to4 and
  # Terredo tunnels your web browser should favor IPv4 for the same reasons
  prefer-ip6: no

  # Use this only when you downloaded the list of primary root servers!
  # If you use the default dns-root-data package, unbound will find it automatically
  #root-hints: "/var/lib/unbound/root.hints"

  # Trust glue only if it is within the server's authority
  harden-glue: yes

  # Require DNSSEC data for trust-anchored zones, if such data is absent, the zone becomes BOGUS
  harden-dnssec-stripped: yes

  # Don't use Capitalization randomization as it known to cause DNSSEC issues sometimes
  # see https://discourse.pi-hole.net/t/unbound-stubby-or-dnscrypt-proxy/9378 for further details
  use-caps-for-id: no

  # Reduce EDNS reassembly buffer size.
  # IP fragmentation is unreliable on the Internet today, and can cause
  # transmission failures when large DNS messages are sent via UDP. Even
  # when fragmentation does work, it may not be secure; it is theoretically
  # possible to spoof parts of a fragmented DNS message, without easy
  # detection at the receiving end. Recently, there was an excellent study
  # by Axel Koolhaas, and Tjeerd Slokker (https://indico.dns-oarc.net/event/36/contributions/776/)
  # in collaboration with NLnet Labs explored DNS using real world data from the
  # the RIPE Atlas probes and the researchers suggested different values for
  # IPv4 and IPv6 and in different scenarios. They advise that servers should
  # be configured to limit DNS messages sent over UDP to a size that will not
  # trigger fragmentation on typical network links. DNS servers can switch
  # from UDP to TCP when a DNS response is too big to fit in this limited
  # buffer size. This value has also been suggested in DNS Flag Day 2020.
  edns-buffer-size: 1232

  # Perform prefetching of close to expired message cache entries
  # This only applies to domains that have been frequently queried
  prefetch: yes

  # One thread should be sufficient, can be increased on beefy machines. In reality for most users running on small networks or on a single machine, it should be unnecessary to seek performance enhancement by increasing num-threads above 1.
  num-threads: 1

  # Ensure kernel buffer is large enough to not lose messages in traffic spikes
  so-rcvbuf: 1m

  # Ensure privacy of local IP ranges
  private-address: 192.168.0.0/16
  private-address: 169.254.0.0/16
  private-address: 172.16.0.0/12
  private-address: 10.0.0.0/8
  private-address: fd00::/8
  private-address: fe80::/10
- Restart Unbound with the following command.
sudo service unbound restart
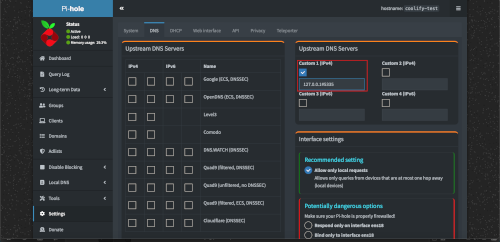
- Open the Pi-Hole web interface, then go to Settings > DNS > Upstream DNS servers.
- Ensure that none of the third-party options are selected.
- Click the checkbox for Custom 1 (IPV4), then in the text box, enter the following. (This is telling Pi-Hole to listen on the localhost at port
5335, which is where the above config file told Unbound to broadcast to.)127.0.0.1#5335
- Make sure your settings match the below image.
- Scroll down to the bottom of the page and click Save.
¶ Resolving the resolvconf.conf errors
If you're using a Debian-based distro for this, you might encounter a conflict with Unbound's resolver and the system's resolvconf service. This can interfere with Pi-Hole/Unbound, so here's how to fix that issue.
- First check to see if the conflict is an issue. Type in the following command on the machine where you installed Pi-Hole (locally or over SSH).
systemctl is-active unbound-resolvconf.service
- If the output of the above command is
active, then stop the service with the following command.sudo systemctl disable --now unbound-resolvconf.service
- The next step is to disable the file resolvconf_resolvers.conf. To do so, input the following commands.
sudo sed -Ei 's/^unbound_conf=/#unbound_conf=/' /etc/resolvconf.confsudo rm /etc/unbound/unbound.conf.d/resolvconf_resolvers.conf
- Finally, restart Unbound with the following command.
sudo service unbound restart